Monday, August 9, 2021

Time To Coast


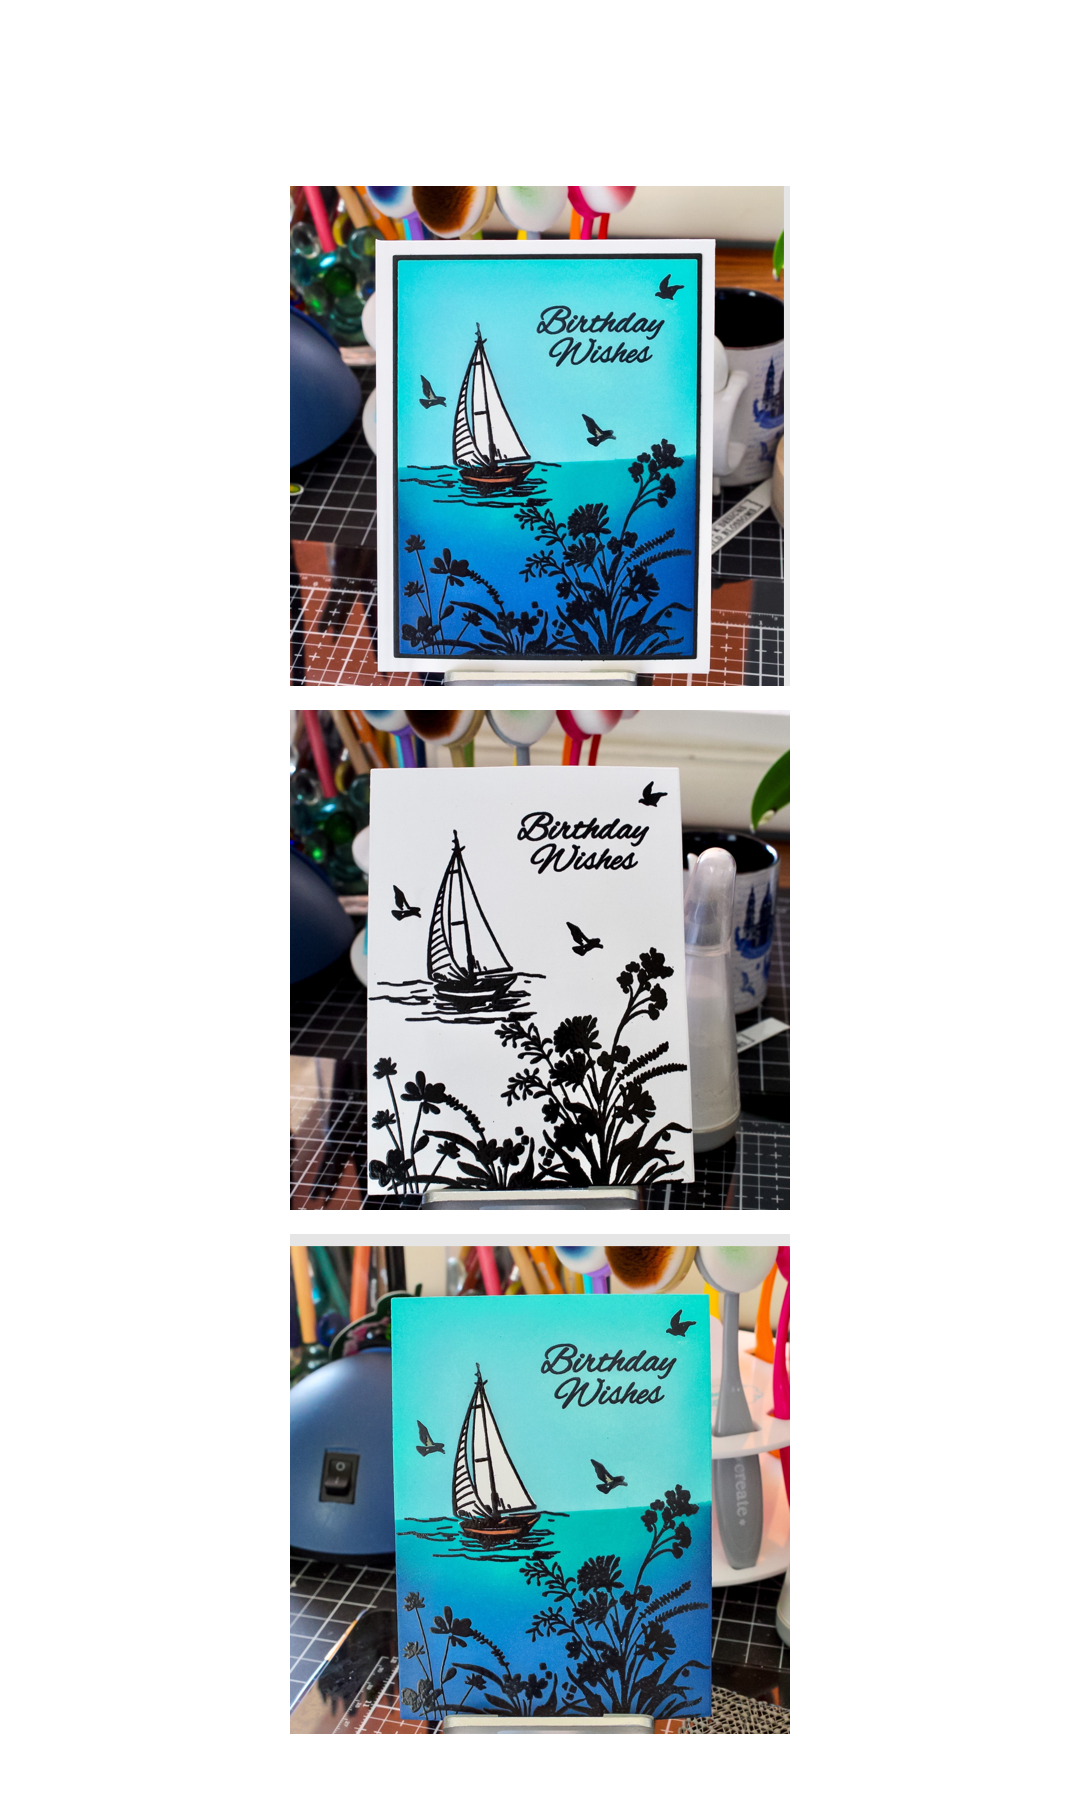
Hello, Crafty Friends! Today's card features the Gina K. Designs Time To Coast and Wild Blossoms stamp set. 


To achieve the following look, please follow the steps below:

1. Today's card is a standard A2 US card base measuring 4 1/4" X 5 1/2"

2. Cut both center panels using the Gina K Designs Master Layouts 1 die set

3. Using the original Misti Stamping Tool or any stamping platform, configure all your stamp images on the smallest panel


4. Stamped all the images using Gina K Designs Black Onyx ink 

*it is important to keep all your images in place on your stamping platform once you are done stamping in black ink*

5. Use an anti-static powder tool to remove any static from your panel

6. Stamp your image with any clear sticky ink (Versa Mark Ink) and add your black embossing powder to all your images

7. Preheat your heat gun until it is nice and hot. This will allow the powder to emboss quicker and prevent your card stock from warping

8. Once your tool is hot, it is ready to emboss the powder

9. Using Gina K Designs Masking Magic or a fully sticky back post-it note, mask off the upper portion of the scene (sky). You will also want to create a mask for your boat image. You do not need to create a mask for your flower images since they are heat embossed (emboss resist technique).

10. Using your Distress Oxide Ink or any Die ink, begin blending your background. Once the blend is to your liking, take a dry paper towel or microfiber cloth and wipe the ink off your heat embossed images.

*make sure to use a dry cloth as Distress inks are water-reactive*

11. Now you will need to remove the upper mask but keep the mask on the boat and place the mask on the bottom portion of the card (ocean) and ink blend the sky. 

12. Remove all masks from your card

13. Using any color medium you are comfortable with and color your boat


14. Start adhering all your panels to the card base


The products used in today's card are as follows:

Gina K Designs- Master Layouts 1, Black Oynx Ink, Masking Magic, Time To Coast, and Wild Blossoms Stamp Set

Distress Oxide Inks- Tumbled Glass, Salvaged Patina, Peacock Feathers, Blueprint Sketch, Prize Ribbon, and Chipped Sapphire

Copic Sketch Markers- E25, E47

I hope you enjoyed today's card and I can't wait to see what you create!


Wednesday, April 28, 2021

Miss you Gnome Much


Hello, Crafty Friends. Today I am sharing this cute gardening gnome from the Simon Says Stamp Spring Gnomies Stamp Set. 


To achieve the following look, please follow the steps below:

1. Use any coloring medium you are comfortable with and color your stamped images.

2. Once your images are colored, use either the coordinating dies or you can fussy cut the images.

3. The dimensions of today's card are 5 1/2" X 4 1 /4" (landscape), 5 3/8" X 4 1/8" (brown layering), and 5 1/4" X 4" (stitched layering)

4. To create the sky background all you need is a cloud stencil, any blending utensils, and a light blue ink pad. Temporarily adhere the stencil to the smaller layering panel. Using your blending tool, lightly apply ink to your card stock until you reach the bottom of the panel.

5. To create the grass, your can use either a specific die as I did or fussy cut a grass-like pattern. Once it is cut, use foam tape to create a gap between the grass and main panel. By doing so, you create added dimension to your card. 

6. Start adhering your colored images to the smaller panel

7. After your images have adhered to your liking, add all your panels to the base of the card. At this point, you can finish your card with a sentiment and add glitter to some of your images for added sparkle. 


The products used in today's card are as follows:

Simon Says Stamp- SSS Spring Gnomies and the coordinating die set

My Favorite Things- Cloud Stencil

Distress Ink- Tumbled Glass (clouds) and Ground Expresso (middle layering panel)

Copic Sketch Markers and the following colors:

ROO, R20, and R21
.W2
.RV00, RV63, RV66, and RV69
.BV00, BV02, BV11, BV04, and BV08
.E21, E23, E25, E29, E27, and E79
.T4, T6, and T8
.E53 and E55
.YG23, G14, G19, G29
.N4, N6, and N8

Spectrum Noir- Clear Glitter Pen

Lawn Fawn- Grassy Border


Thursday, April 15, 2021

Octopi

Hello, crafty world. Today I made my very own slimline card! Originally I was in a coloring mood but decided I couldn't let the images go to waste. Crafty Friends, today I share with you a slimline card filled with fun-loving octopi madness!!


To achieve the following look, please follow the steps below:

1. Use any coloring medium you are comfortable with and color your stamped images.

2. Once your images are colored, use either the coordinating dies or you can fussy cut the images.

3. The dimensions of today's card are 8 x 9-inch (base), 3 5/8 x 8 5/8-inch (layering), and 3 1/2 x 8 1/2-inch (image)

4. Using your Distress Ink, begin blending your background. 

5. Once your background is nice and dry, use an anti-static powder tool to remove any static from the card stock.

6. Stamp your image with any clear sticky ink and add your clear embossing powder.

7. Preheat your heat gun until it is nice and hot. This will allow the powder to emboss quicker and prevent your card stock from warping.

8. Once your tool is hot, it is ready to emboss the powder.


9. To create the seafloor, you can use either a specific die as I did or fussy cut in a wavy pattern. Once it is cut, use foam tape to create a gap between the floor and the main panel. By doing so, you create added dimension to your card. 

10. Start adhering your colored images to the panel 

11. After your images have adhered to your liking, add all your panels to the base of the card. At this point, you can finish your card with a sentiment or jewels for added sparkle.


The products used in today's card are as follows:

Lawn Fawn - Mermaid For you, Christmas Fishes, Octopi My Heart, Duh-Nuh, and Ocean Shell-Fie stamp sets. Ocean Waves and Stitched Hillside Border Die sets

Prismacolor Premier Colored Pencils - 72pack. Unfortunately, I did not write down the specific colors I used, however, I can say I almost used all 72 pencils, haha

Copic Sketch Markers- W2, W3, W5 ,W7,C1, C3, C5, C7, G14, G19, G29, E51, E31, and E 43

Distress Oxide Inks- Tumbled Glass, Peacock Feathers, Pine Needles, Blueprint Sketch, Vintage Photo, Brushed Cordury, and Walnut Stain

I hope you enjoyed today's card and I can't wait to see all your crafty creations, bye.


Sunday, March 28, 2021

Happy Birthday

Hello, crafty friends. Today I am sharing a birthday card using the Tonic Studios Shoot For The Moon Stamp Set. Unfortunately, this stamp set is out of stock, however, you can achieve the same look by using similar images from other wonderful stamp companies.


To achieve the following look, please follow the steps below:

1. Use an anti-stack powder tool to remove any static from the card stock. This will also prevent the embossing powder from sticking to the areas that are not being embossed. 

2. Stamp your image with any clear sticky ink and add your black embossing powder. 

 3. Preheat your heat gun until it is nice and hot. This will allow the powder to emboss quicker and prevent your card stock from warping. 

4. Once your heat tool is hot, it is ready to emboss the powder. *
If you do not have black embossing powder, you can still achieve the same look by stamping with black pigment ink and use clear embossing powder instead. Dye Ink will not work and will dry almost instantly while Pigment Ink will stay wet longer.*

5. Using your Distress Ink, begin blending your background. After inking your background and it is dry, use a dry cloth and remove the ink from the embossed image. This technique is also known as the emboss resist technique. *Add a masking sheet on all areas you do not wish to ink*

6. After the background is dry, stamp your background image.

7. Assemble your card and add any embellishments for added sparkle.
 

The products used in today's card are as follows:

Tonic Studios- Stamp Club, Shoot For The Moon stamp set

Distress Oxide Ink- Blueprint Sketch, Pine Needles, Twisted Citron, and an Ink Blender using the new Domed Foam

Wow- Super Fine Ebony Embossing Powder

Gina K Designs- Moonlit Fog Die Ink, Master Layouts 1,  and Masking Magic

Altenew- Gold Washi Tape

Pretty Pink Posh- Spring Green Jewels

I hope you enjoyed today's card, happy crafting!


Monday, March 22, 2021

Beautiful Butterflies

Hello, crafty friends. I finally finished my butterfly card. Today's card was inspired by the Simon Says Stamp Beautiful Butterflies stamp set and coordinating die set. 


The products used in today's card are as follows:

Simon Stays Stamp - Beautiful Butterflies Stamp Set and Coordinating Die Set, Butterfly Trails Stencil

My Favorite Things - Small Brick Wall Stencil

Gina K Designs - Moonlit Fog, Sandy Beach, Soft Stone, and Faded Brick Die Ink, Obsidian Amalgam ink, Master Layouts 1

Prismacolor Premire Colored Pencils - (blue) PC931, PC901, and PC905 (green) PC909, PC910, PC913, and PC915 (body) PC941 (orange) PC925, PC918, and PC916

Spectrum Noir - Clear Glitter Pen


I hope you enjoyed today's card. Happy crafting!