Saturday, December 19, 2020

Each day is a new start

Hello and welcome to my blog. Today I wanted to showcase a card featuring the Altenew Build-A-Flower Primrose Layering Stamp Set, along with the Gina K. Designs Master Layouts 1 Die Set, and a sentiment from the Simon Says Stamp Clear Stamps Beautiful Butterflies.


Steps used in the process of creating this card are as follows:

1. Cut out all your panels from the Master 1 Layouts die set
2. Use an anti-static powder tool to prep your surface for heat embossing
3. Use a clear and sticky ink to stamp all your images
4. Pour heat embossing powder over the stamped images and apply heat with a heat tool to melt the embossing powder
5. Select dye ink colors to ink blend your background (ink resist technique) Once the panel is completely inked, use a soft cloth or paper towel to wipe the ink off the embossed images
6. Flick metallic watercolor to your background for added shimmer
7. Stamp and layer your sentiment onto your card
8. Apply jewels for added sparkle


I hope you enjoyed today's card. Thanks for stopping by!


Saturday, December 12, 2020

Altenew-Final Challenge


Hello and Welcome,

I am on my final challenge for the Level 1 Altenew Educator Certification Program.

For this challenge I was to create one set of Masculine and one set of Feminine cards. For these I had to use at least three techniques I learned from AECP level 1 courses. Both sets must be cohesive and I was to use a recycled item as part of the challenge. The AECP techniques I used are as follows:

1. All about ink Blending
2. Easy Die Cut Techniques
3. Let it Shine
4. Stencil Techniques

For my first set of cards, I used the following items:
Stackable circle die set (any)
Altenew - Gold foil card stock
Distress Oxide inks
Altenew - Hello die set
Altenew - Monsteria 3D die set

To begin my card I selected the size from my stackable circle die set to cut the center of my card stock. Once the center is cut,  I use the same size circle and one size larger to make the center frame. I cut my frame using the Altenew gold foil card stock. As a reminder, when cutting the center of the card, make sure to open the card so you do not accidentally cut the back of the card; unless that is the look you are going for.

Once my frame was adhered, I used the one size larger circle die to cut the center background. After my background was cut, I used my Distress Oxide inks  (Speckled Egg, Tumbled Glass, Mermaid Lagoon, Spun sugar, Worn Lipstick, Picked Raspberry) to create an ombre of colors.


 Masculine card - I used the Altenew monsteria 3D die set, layered the leaves, and adhered them to the background. Using the Altenew hello die, I cut three hellos from white card stock and one from the Altenew gold foil card stock. I adhered all the Hello die cuts together and glued them on top of the leaves for added dimension.

 
Feminine card - I followed the same process leaving out the center leaves and added jewels for added sparkle.

For my second set of cards, I used the following items:
Altenew - Hello die set
Altenew - Gold foil card stock
Altenew - Dotted Blooms stamp set with coordinating dies
Altenew - Stone wall stencil
Altenew - Metallic water Color
Stackable rectangle die set (any)
Distress Oxide inks

My first process when creating both cards was to cut all my layering pieces out using any stackable rectangle die set you have. 


Masculine card - I made sure to cut one of the layering pieces out of the Altenew gold card stock. Once the layers were cut, I used my Altenew stone wall stencil and embossed the stencil into the card stock. To achieve the embossed look, I used my die-cutting machine and followed the manufacture recommendations for embossing. Once the paper was embossed, I used Distress Oxide inks to create another ombre background. Be careful not to blend too hard since the paper has been embossed. After I was done with ink blending, I used the Altenew metallic watercolors to flick gold splatters across the ink blending. I cut three Hellos out of white card stock and one out of the Altenew gold card stock and adhered them together for added dimension.


Feminine card - Using the coordinating die set from the Altenew dotted blooms stamp set, I cut one of my layering rectangle pieces. I stamped the flower onto the cutout. I used the same pink colors of Distress ink to create one of my panels while matching the colors of the flower petals. I embossed the die cut background using the Altenew stone wall stencil. To achieve the embossed look, I used my die cutting machine and followed the manufacture recommendations for embossing. After embossing, I inlayed the flower into the cutout.  I cut three Hellos out of white card stock and one out of the Altenew gold card stock and adhered them together for added dimension. Once I adhered to all the panels, I added some jewels for added sparkle.


For my third set of cards, I used the following items:
Altenew - Thank You die set
Altenew - Gold washi tape
Altenew - Stone wall stencil
Altenew - Gold foil card stock
Altenew - Mariposa die set
Distress Oxide ink
Stackable rectangle die set (any)
Glitter paper


For both sets of cards, I used the Altenew thank you die set. I cut three thank yous out of white card stock and one out of the Altenew gold card stock and adhered them together for added dimension. I also used Distress Oxide ink to create a thank you shadow by adhering the colored thank you offset. 


Masculine card - I used the Altenew gold foil for my card base. Using the same rectangle die set, I cut my layering pieces out of white card stock. Using the same Distress ink colors, I created my blue panel.  I embossed the die cut background using the Altenew stone wall stencil. To achieve the embossed look, I used my die-cutting machine and followed the manufacture recommendations for embossing. To finish the card, I added the thank you die cuts for added dimension.


Feminine card - I cut a 1.5" strip of card stock and used my Distress ink to create the pink panel. Using the Altenew gold washi tape to separate the colored panel from the white base of the card. I cut two butterflies out of white card stock and one out of pink glitter paper. I adhered to the center of the butterflies making sure not the adhere the wings to give the effect of them getting ready to fly off the card and it helps give the card more dimension. To finish the card by adding the thank you die cuts to the center of the card.


For my fourth and final set, I used the following items:
Altenew - Monsteria 3D die set
Altenew - Metallic watercolor set
Altenew - Build-A-Flower Balloon Flower stamp set with coordinating die
Altenew - Antique gold embossing powder
Altenew - Gold foil card stock
Altenew Gold washi tape
Copic markers
Distress Oxide ink


Masculine card - I used the Altenew gold foil card stock for my card base. Using the same stackable rectangle die set, I cut my layering pieces out of white card stock. For the focal point of my card, I used the Altenew monsteria 3D die set. Once I cut all the leaves and pot out of white card stock, I decided to use my Copic markers for added color. I matched my markers to the Distress ink I was using and finished by using the Altenew metallic watercolors for added shimmer. Using the same watercolors, I splattered the color onto a smaller white layering panel and stamped the hello sentiment from the Altenew Build-A-Flower Balloon Flower stamp set.


Feminine card - I started by cutting a 2" panel out of white card stock. Once the panel was cut, I used the same Distress Oxide ink colors to create a pink panel. After the ink dried, I used an anti-static powder tool to remove all static from the panel before heat embossing. Using a dotted stencil and clear sticky ink, I heat embossed the dots using the Altenew antique embossing power. To finish the panel, I used the Altenew gold washi tape. To create the focal point of the card I decided to use the same Balloon Flower stamp set from Altenew along with the sentiment from the stamp set.

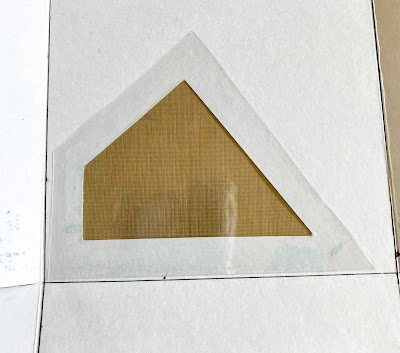
For the final piece of the challenge, I created a window box set for both my masculine and feminine cards out of recycled thin cardboard that was wrapped in white cardstock and created an acetate window out of the Altenew packaging. I adhered the acetate to the box using a tape runner. The box measures 7 1/2 X 6 1/2 and all four sides scored at 1".


Since the box was wrapped in white card stock, it gave me the ability to use the same Distress ink colors to make sure everything stays in a cohesive manner. To separate the colors, I decided to use the same Altenew gold washi tape.


For the white panel, I wanted to give the recipient an opportunity to see through the box to get a glimpse at the cards awaiting them.


I hope you enjoyed the journey with me as I had fun sharing my creations with you. I hope this will inspire you to join the Altenew Academy and as always, I can't wait to see what you create.


Wednesday, October 21, 2020

Altenew-All About Layering 2


Hello. Today's card is all about stamp layering inspired by the Altenew Academy, All About Layering 2 class.


I used the Altenew Build-A-Flower Balloon Flower stamp set with its coordinating dies. I first stamped my image using dye inks for each of the layering pieces. Once the images were stamped, I used the coordinating dies to cut them out. I arranged the images to my liking and used low tack tape to hold the images together. 


Before working on my background, I stamped my sentiment on the bottom right corner of the card. 

For the background, I used the Altenew metallic watercolor pallet to create shimmery splatters. Once the watercolor was finished drying, I adhered the flowers and leaves to the center of the card and removed the low tack tape that was temporarily holding the images together.


I hope you enjoyed today's clean and simple card, bye.


Thursday, October 15, 2020

Altenew- Irresistible Ink Techniques


Hello. Today's card was inspired by the Altenew Irresistible Ink Technique class. 


Today's clean and simple card was created using the Ink Smooshing Technique. To achieve this technique all you need is a few dye inks, water, water brush, heat tool and a craft mat or a glass media mat. 

Apply your ink to your media mat along with a few water drops. Using a water brush, lightly mix the ink into the water. Once the colors are mixed to your liking, take your card stock and lay it directly into the mixed media. Let it sit for a few seconds before picking up the card stock. Keep applying the media until the panel is completely covered. Between ink layers,  make sure to dry the panel with your heat tool to keep the paper from becoming overly saturated.


After the panel was completely dried, I die cut the center image from the Altenew Monstera 3D Die Set. I die cut the images a few times and layered them together for added dimension. 

After I adhered the imaged to the center panel, I cut a few strands of blue twine and added them to the corners of the card. 

I finished the card using some Pretty Pink Posh jewels for added sparkle.


Thursday, October 8, 2020

Altenew-Easy Die Cutting Techniques


Hello and welcome!  Today's card is inspired by the Altenew Academy class, Easy Die Cutting Techniques. 


Today is all about the quick and simple inlay die cutting technique. To achieve this technique, all you need is a stamp and the coordinating die. I decided to use the Altenew Dotted Blooms stamp set and  coordinating die. 

I started my card by stamping my image and once the image has been stamped and colored, I used the die to cut it out. Using the same die I cut the center of my card stock along with the layering panels. Make sure the card is in the open position before running it through your die cut machine. If you do not open your card, the image will cut through the front and back of the card.  


I used a dotted embossing folder to add texture to the card. Using the Altenew Hello die, I cut two words and slightly offset them for a shadow effect. 

To finish the card, I added a few jewels for some added sparkle.


Altenew: Celebration Stencil Techniques


Hello. Today's inspiration comes from the Altenew Academy Class, Celebrate Stencil Techniques.


Using the Altenew Stonewall stencil, I applied a layer of Ranger Texture Paste. Once the paste was finished drying, I applied Altenew metallic watercolor to give the stones a more rustic look.


Keeping the card clean and simple, I used the Altenew Thank You die set and inlayed the sentiment into the stonewall panel.

To finish the card I added some clear sequins for added sparkle.


Wednesday, October 7, 2020

Altenew: Seasonal Scene Building


Hello and welcome! Today I am sharing a card inspired by the Altenew Academy class: Seasonal Scene Building. 


I wanted my scene to convey the feeling of being outside and looking through a window.


I started out with a brick stencil and grey dye ink for the background. Once my  ink blending was finished, I placed the window die in the center of  the card and ran it through a die cut machine. I also cut another window out of woodgrain cardstock. 

Since most homes have a potted plant in the window, I decided the Altenew Monsteria 3D die set was the perfect choice. 


Using the Altenew Mariopsa die set, I cut two butterflies from glitter green card stock and adhered them to the outside of the window. 

I finished the card by adding a sentiment from the Altenew Dotted Blooms stamp set and adhered the sentiment using foam tape for added dimension.  


Monday, September 28, 2020

Altenew- Let it Shine


Hello! Today I am sharing a card inspired by the Altenew Academy class, Let it Shine. I can't get enough of the sparkly butterflies 🦋


I will be using the Simon Says Stamp Butterfly Trails Stencil along with my
Distress Oxide Inks. 

Starting from the upper right corner I am ink blending Picked Raspberry, Wilted Violet and Broken China Distress inks. 

After ink blending gently wipe your stencil using a dry Microfiber cloth or a dry paper towel. Distress Oxide inks are water reactive and will oxidize if your cloth is wet. Once the stencil is free of ink, apply a layer of Tonic Moonstone Nuvo Glimmer Paste for added sparkle. 


 Using the Altenew Mariposa die set, I cut the butterflies from black card stock and applied Altenew Metallic Watercolors for added shimmer. Once the butterflies were done drying, I added score lines to the sides of the wings for added dimension. 


For my sentiment, I used the Hello There stamp from the Altenew Build-A-Flower: Primrose stamp set.


I hope you enjoyed today's card. Thanks for stopping by!


Friday, September 18, 2020

Altenew- For the Guys


Hello and welcome back! Today I am sharing a card inspired by the Altenew Academy class, For the Guys. I really like how the stone wall stencil turned out. The way Distress Oxide inks oxidize create a chalky finish, which makes the stones look more realistic. 


I wanted my masculine card to have color and remain on the simplistic side so I decided the reverse stencil technique was the best way to achieve both. 


To create the reverse stencil technique you first need to lay down your ink colors with an ink blending tool. After your color has been blended, you want to apply your stencil and cover your background with black ink. Once the panel has been completely inked, slowly peel the stencil off your card stock. Doing this slowly is the key in order to keep your lines from smearing.

Distress inks are as follows:

Tumbled Glass
Mermaid Lagoon
Blueprint Sketch
black Soot


To create my sentiment, I used the Altenew Simply Hello die set. I cut three from white card stock and one from black card stock. I stacked all three white die cuts for added dimension and slightly offset the black die cut for a shadow effect. I added a few clear jewels and glued my panel to a top folding card base.

I hope you enjoyed today's card and I can't wait to see your crafty creations. 


Saturday, August 29, 2020

Altenew-Easy Ink Blending


Hello and welcome to today's post.


Today's card was inspired by the Altenew Easy Ink Blending class. This class is all about achieving great ink blending projects. Having the proper paper and ink blending tools are key to achieving the best results. I would also recommend trying the Distress Oxide inks as they are very easy and forgiving.


 Oxide inks are a special blend of pigment and dye ink which makes them very forgiving for crafters new to ink blending. Not only are they easy to use but they are also water-reactive, creating an oxidized effect when sprayed with water. Blending can be accomplished with either a blending brush or an ink bending tool. 

Listed are the Distress colors:

Mustard Seed
Picked Rasberry
Seedless Preserves
Salty Ocean

The flower and leaves are from the Altenew Build-A-Flower Hibiscus stamp set and cut out with the coordinating die set. Foam tape was used to adhere the images for added dimension. 

Once the background was completely dry, I heat embossed the sentiment with white embossing powder. Remember to use an anti-static power tool to remove any and all static cling. 


To finish off the card, I adhered some clear jewels from Pretty Pink Posh. 

I hope you enjoyed today's card and I can't wait to see all your ink blending projects.


Wednesday, August 26, 2020

Clean and Simple Boutique Cards


Hello, crafty friends. Today I wanted to share my clean and simple card inspired by the Clean and Simple Boutique Card class from Altenew.


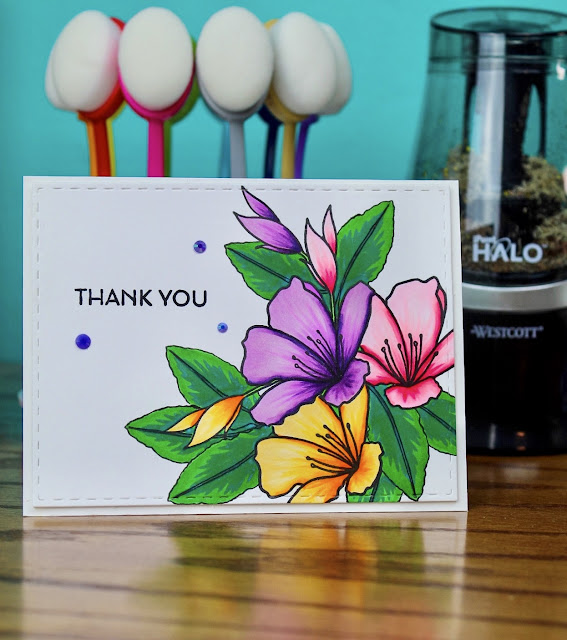
 I will admit I often struggle with clean and simple cards but I love how the card turned out. I really wanted to showcase the simplicity of the card but also allow the colors of each flower to really stand out. The flowers are from the Altenew Springtime Azalea stamp set and colored using copic markers. 

The copic colors are as follows:

 V01, V04, V06, V09, BV08

RV00, RV13, RV21, RV25, RV29

Y32, Y35, Y38, YR04, YR68


After I colored the flowers I needed to stamp the leaves to give it a more boutique feel. With my flowers already stamped and colored, I needed a technique that would stamp the leaves in the background without interfering with the already colored images. 

The solution was to create multiple masks that would fit directly over the colored flowers. Using some post-it notes, I stamped the Azalea and fussy cut the post-it note. Once the mask had been cut out I temporarily adhered them directly over the already stamped image. The masking technique allows you to create an image behind another image, creating the illusion of depth. Remember when stamping multiple images, make sure to start with the image you want to be in the front and then stamp your other images. 

I finished the card with a few jewels and added sparkle to the flowers using my Spectrum Noir glitter pen.

I hope you enjoyed today's card, thanks for stopping by.