Sunday, January 15, 2023

Happy Valentine’s Day

Happy New Year! Today I will be sharing a Valentine’s Day card featuring products from Simon Says Stamp and Lawn Fawn. 


This interactive card is simple yet fun to make. I love how you can turn both mini envelopes into special surprise notes for your recipient.


Click on the video link to see how this card was created. 


Listed below are products used to create this card along with the links to their shop.


Simon Says Stamp - (click to be directed to the website)

. Simple Valentine’s Day Die Set
. Mini Interactive Envelope Die Set
. Tossed Hearts Cling Stamp

Lawn Fawn - (click to be directed to the website)

. Push Here Stamp Set
. Love Poems Stamp Set
. Heart Shaker Gift Tag
. Say What? Gift Tag

Gina K Designs - (click to be directed to the website)

. Black Onyx Dye Ink
. Light Carnation Dye Ink
. Medium Carnation Dye Ink
. Darcy Carnation Dye Ink

Tim Holtz 
. Idea-Ology Metallic Colors [SSS]


Saturday, December 31, 2022

Masculine Cards

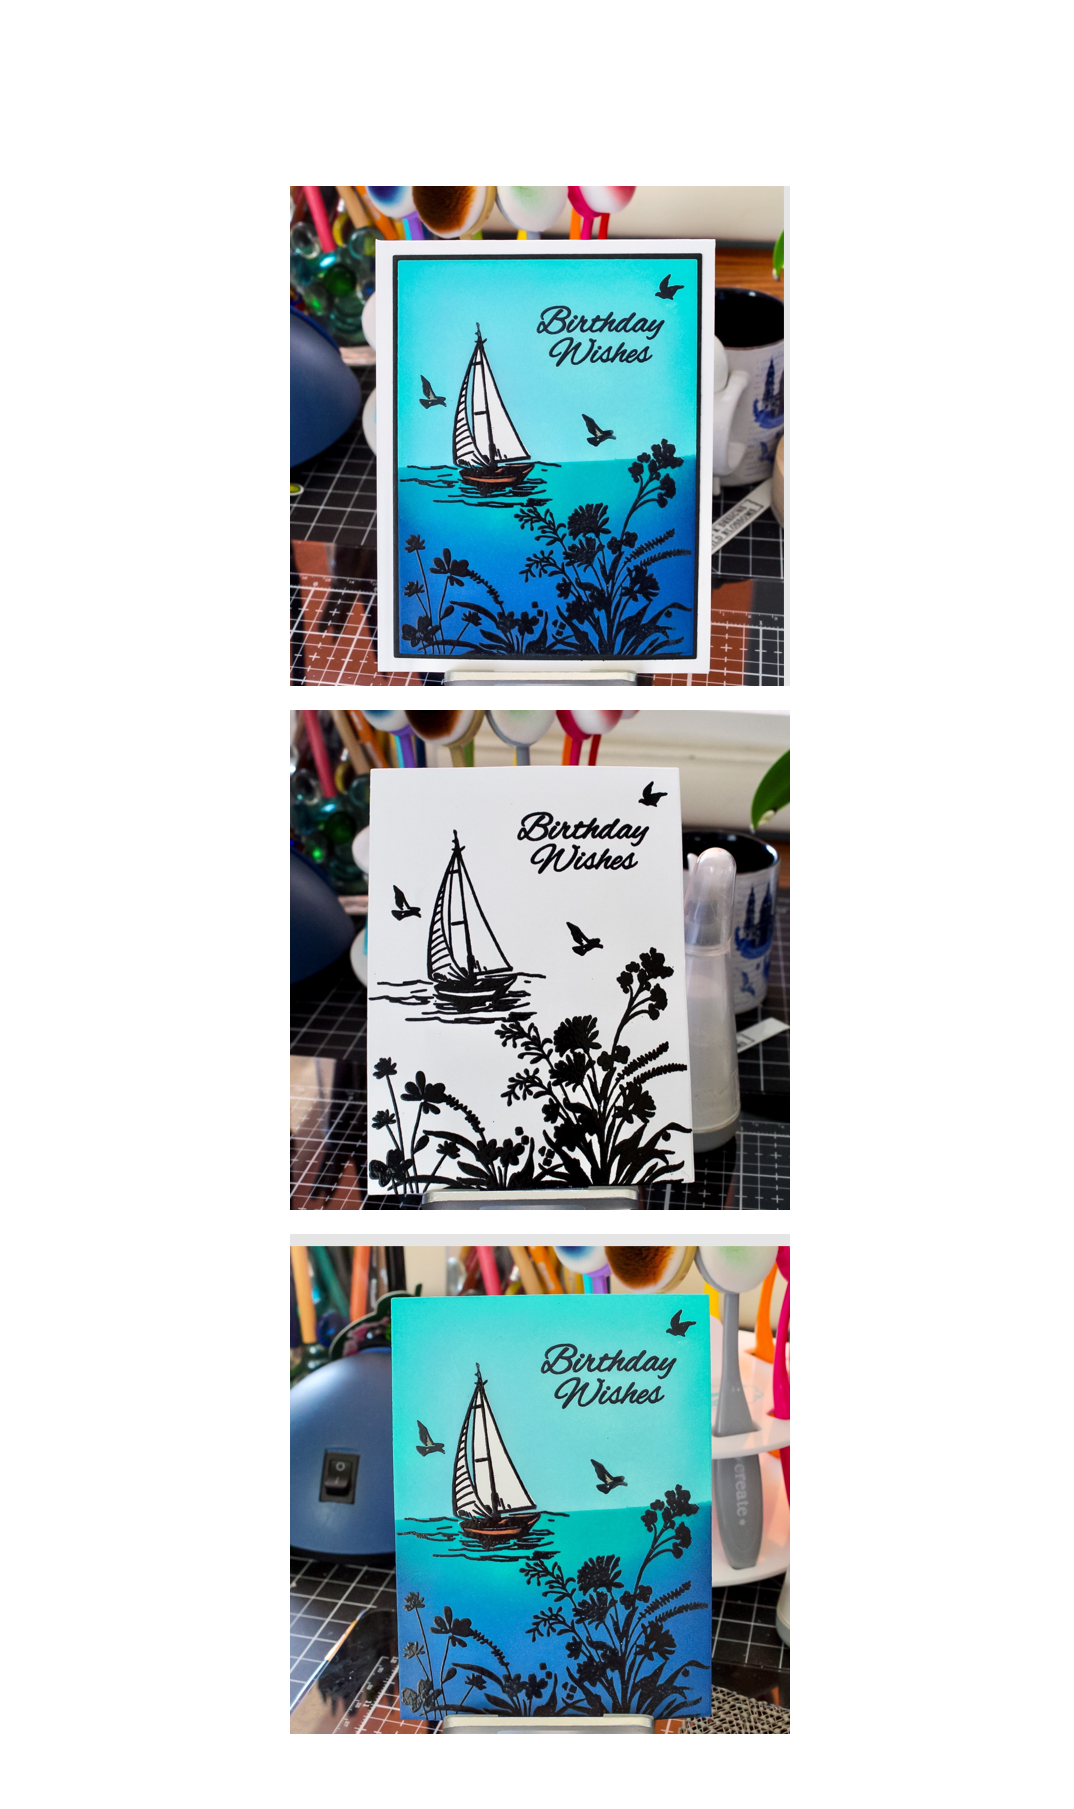
Hello and welcome back to another blog post. Today we will focus on masculine themed cards for both Christmas and Birthdays.

Masculine cards can sometimes be challenging but Spellbinders Paper Arts has wonderfully easy to put together die sets to help achieve such looks. It is even better when you can take one die set and create different occasions especially since they are at a higher price point. 


For more information on how these cards were created, please click on the video link below.


Listed are the following products used to create both cards.

Spellbinders -(click to view the website)

. Through The Woods Die Set [SSS]

Gina K Designs -(click to view the website)

. Black Onyx Card Stock
. Connect Glue
. Fine Tip Bottles
. Summer Silhouettes Stamp Set
. Whisper Amalgam Ink
. Black Embossing Powder [SSS]
. Fancy Foil Brilliant Blue and Glittering Green [SSS] [TW]
. Deco Foil Toner Sheets [SSS] [TW]

Simon Says Stamp - (click to view the website)

. Detail Pincushion Die Plate
. Waffle Flower Stencil Mat

Taylored Expressions - (click to view the website)

. Anti-Static Powder tool [SSS]


Monday, December 19, 2022

Christmas Wishes

 Hello and welcome back to my blog. Today we will focus on partial ink blending using Masking Magic by Gina K Designs.


For more information on how to create a partial ink blended card, please click on the video link below. 


Listed are the following products used to create today’s card.

Gina K Designs - (click to view the website)

. Master Layouts 1 Die Set
. Medium Orchid, Blue Lagoon, Soft Stone and Wild Lilac Dye Ink
. Black Onyx, In The Navy, and Soft Stone Card Stock
. Connect Liquid Adhesive
. Fine Tip Bottles

Simon Says Stamp - (click to view the website)

. Snowflake Season Stamp Set
. Friendship Text Background Stamp
. Misti Stamping Tool
. Flannel Gray Ink Club Holder and Mesh Storage
. Black Embossing Powder [GKD]
. Taylor Made Expressions Embossing Powder Tool [[TME]
. Little Things White Pearls
. Studio Katia Embellishment Wand


Monday, December 12, 2022

Holly Jolly Gnomes


Happy Holidays!

 I can't believe Christmas is right around the corner! Today I wanted to share these adorable gnomes from Spellbinders as part of their Gnome for Christmas Collection. Not only are these gnomes incredibly adorable but they also swing from a holiday ornament as it is interactive! 


For more information on how these cards were created, please click on the video link below.


Listed are the following products used to create all four cards.

Spellbinders - (click to be directed to website)

. Holly Jolly Gnome Etched Dies from Gnome for Christmas Collection [SSS]

Simon Says Stamp - (click to be directed to website)

. SSS card stock assortment glitter

. SSS Filigree Snowflakes Embossing Folder and Scandinavian Christmas Embossing Folder 

. Gina K Designs Connect Glue and Fine Tip Applicator Bottle - [GKD]

.Gina K Designs Black Onyx Card Stock and Red Hot Card Stock- [GKD]

. Altenew Metallic Watercolor [ALT]


Saturday, November 12, 2022

Thanks For All You Do


Sometimes all you need is one layering stencil to create a simple card design and a bold sentiment to top it off! Todays card was inspired by the thoughtfulness of a family member. I hope she enjoys it as much as I enjoyed making it for her.


Layering stencils are a great way to add depth to your card in a quick and simplistic way. They are easy to use with so many possibilities!


Please click on the video link below to see how this card was created ⬇️


Listed below are the products used in todays video.

Gina K Designs - (click to view website)
  • Delightful Blooms Layering Stencil
  • Thanks and Shadow Die 
  • White Pigment Ink
  • Light, Medium, and Dark Orchid dye ink
  • Light, Medium, and Dark Lilac dye ink
  • Light, Medium, and Dark Spruce dye ink
  • Sea Glass dye ink
  • Blue Lagoon dye ink
  • Tranquil Teal dye ink
  • Black Onyx dye ink
  • Master Layouts 1 Die Set
  • Black Onyx card stock
  • Fine Tip Bottle 
  • Connect Glue
Simon Says Stamp - (click to view website)
  • Flannel Gray Ink Cube Holder and Mesh Storage 
  • Studio Katia Embellishment Wand
  • Altenew Metallic Watercolor
  • Ranger Glossy Accents
  • Vellum
  • Little Things From Lucy’s Cards Pearls Glossy Porcelain


Monday, October 17, 2022

Thanks For Everything

 Hey everyone! Gina K Designs has a monthly kit that is jammed packed with amazing products with an incredible value. With that being said, one of her kits included a pack of beautiful Ephemera sheets and coordinating die. I have never worked with Ephemera before so I thought I would challenge myself and incorporate them on one of my cards. Needless to say I love it! To be honest, I thought it might take away the handmade feel since they are preprinted images on thick paper, I was so wrong! 

Here is the final results!


Please click on the video link below to see how the card was created ⬇️


The following products were used to create this colorful card:

Gina K Designs- https://ginakdesigns.com/

  • Ephemera- Autumn Splendor Ephemera Sheets
  • Thanks Die and Shadow Die
  • Master Layouts 01 Die Set
  • Double Stitched Die Set
  • Summer Silhouettes Stamp Set
  • Doodled Autumn Stamp Set
  • . Dark Chocolate and Black Onyx Card Stock
  • Black Embossing Powder and Anti Static Powder
Ranger Distress Oxide Inks- https://www.simonsaysstamp.com/
  • Candied Apple Oxide Ink
  • Carved Pumpkin Oxide Ink
  • Mustard Seed Oxide Ink
  • Ground Expresso Oxide Ink
  • Black Soot Oxide Ink
  • Round Ink Blending Tools 
  • Domed Ink Blending Foam
  • Satin Gold Pearls
  • Embellishment Wand
  • Christmas mini set

Sunday, October 9, 2022

Happy Anniversary


Happy Anniversary to my other half! I can’t believe a decade has zipped by so fast. To many more years of you being the loving pain in my butt, lol. I couldn’t have asked for a more perfect loving, caring, and devoted partner. 

I hope you love your custom one of kind special requested Anniversary card!


Please click on the video link below to see how the card was created ⬇️


The following products were used to create this colorful card:

Gina K Designs- https://ginakdesigns.com/
  • Connect Glue
  • Fine Tip Bottles
  • Summer Silhouettes Stamp Set
  • Time to Coast Stamp Set
  • Friendly Silhouettes Stamp Set
  • Wild Blossoms Stamp Set
  • Master Layouts 01 Die Set
  • Black Onyx Card Stock 
  • Black Embossing Powder and Anti Static Powder Bag
VersaMark
  • WaterMark Ink 
  • WaterMark Pen
Amazon
  • Full sticky back Post It Notes
  • Prisma Premier water color pencils 36ct.
  • Watercolor Card Stock
Studio Katia
  • Blue Azurite Pearls
  • Embellishment Wand


Monday, August 9, 2021

Time To Coast


Hello, Crafty Friends! Today's card features the Gina K. Designs Time To Coast and Wild Blossoms stamp set. 


To achieve the following look, please follow the steps below:

1. Today's card is a standard A2 US card base measuring 4 1/4" X 5 1/2"

2. Cut both center panels using the Gina K Designs Master Layouts 1 die set

3. Using the original Misti Stamping Tool or any stamping platform, configure all your stamp images on the smallest panel


4. Stamped all the images using Gina K Designs Black Onyx ink 

*it is important to keep all your images in place on your stamping platform once you are done stamping in black ink*

5. Use an anti-static powder tool to remove any static from your panel

6. Stamp your image with any clear sticky ink (Versa Mark Ink) and add your black embossing powder to all your images

7. Preheat your heat gun until it is nice and hot. This will allow the powder to emboss quicker and prevent your card stock from warping

8. Once your tool is hot, it is ready to emboss the powder

9. Using Gina K Designs Masking Magic or a fully sticky back post-it note, mask off the upper portion of the scene (sky). You will also want to create a mask for your boat image. You do not need to create a mask for your flower images since they are heat embossed (emboss resist technique).

10. Using your Distress Oxide Ink or any Die ink, begin blending your background. Once the blend is to your liking, take a dry paper towel or microfiber cloth and wipe the ink off your heat embossed images.

*make sure to use a dry cloth as Distress inks are water-reactive*

11. Now you will need to remove the upper mask but keep the mask on the boat and place the mask on the bottom portion of the card (ocean) and ink blend the sky. 

12. Remove all masks from your card

13. Using any color medium you are comfortable with and color your boat


14. Start adhering all your panels to the card base


The products used in today's card are as follows:

Gina K Designs- Master Layouts 1, Black Oynx Ink, Masking Magic, Time To Coast, and Wild Blossoms Stamp Set

Distress Oxide Inks- Tumbled Glass, Salvaged Patina, Peacock Feathers, Blueprint Sketch, Prize Ribbon, and Chipped Sapphire

Copic Sketch Markers- E25, E47

I hope you enjoyed today's card and I can't wait to see what you create!


Wednesday, April 28, 2021

Miss you Gnome Much


Hello, Crafty Friends. Today I am sharing this cute gardening gnome from the Simon Says Stamp Spring Gnomies Stamp Set. 


To achieve the following look, please follow the steps below:

1. Use any coloring medium you are comfortable with and color your stamped images.

2. Once your images are colored, use either the coordinating dies or you can fussy cut the images.

3. The dimensions of today's card are 5 1/2" X 4 1 /4" (landscape), 5 3/8" X 4 1/8" (brown layering), and 5 1/4" X 4" (stitched layering)

4. To create the sky background all you need is a cloud stencil, any blending utensils, and a light blue ink pad. Temporarily adhere the stencil to the smaller layering panel. Using your blending tool, lightly apply ink to your card stock until you reach the bottom of the panel.

5. To create the grass, your can use either a specific die as I did or fussy cut a grass-like pattern. Once it is cut, use foam tape to create a gap between the grass and main panel. By doing so, you create added dimension to your card. 

6. Start adhering your colored images to the smaller panel

7. After your images have adhered to your liking, add all your panels to the base of the card. At this point, you can finish your card with a sentiment and add glitter to some of your images for added sparkle. 


The products used in today's card are as follows:

Simon Says Stamp- SSS Spring Gnomies and the coordinating die set

My Favorite Things- Cloud Stencil

Distress Ink- Tumbled Glass (clouds) and Ground Expresso (middle layering panel)

Copic Sketch Markers and the following colors:

. ROO, R20, and R21
.W2
.RV00, RV63, RV66, and RV69
.BV00, BV02, BV11, BV04, and BV08
.E21, E23, E25, E29, E27, and E79
.T4, T6, and T8
.E53 and E55
.YG23, G14, G19, G29
.N4, N6, and N8

Spectrum Noir- Clear Glitter Pen

Lawn Fawn- Grassy Border


Thursday, April 15, 2021

Octopi

Hello, crafty world. Today I made my very own slimline card! Originally I was in a coloring mood but decided I couldn't let the images go to waste. Crafty Friends, today I share with you a slimline card filled with fun-loving octopi madness!!


To achieve the following look, please follow the steps below:

1. Use any coloring medium you are comfortable with and color your stamped images.

2. Once your images are colored, use either the coordinating dies or you can fussy cut the images.

3. The dimensions of today's card are 8 x 9-inch (base), 3 5/8 x 8 5/8-inch (layering), and 3 1/2 x 8 1/2-inch (image)

4. Using your Distress Ink, begin blending your background. 

5. Once your background is nice and dry, use an anti-static powder tool to remove any static from the card stock.

6. Stamp your image with any clear sticky ink and add your clear embossing powder.

7. Preheat your heat gun until it is nice and hot. This will allow the powder to emboss quicker and prevent your card stock from warping.

8. Once your tool is hot, it is ready to emboss the powder.


9. To create the seafloor, you can use either a specific die as I did or fussy cut in a wavy pattern. Once it is cut, use foam tape to create a gap between the floor and the main panel. By doing so, you create added dimension to your card. 

10. Start adhering your colored images to the panel 

11. After your images have adhered to your liking, add all your panels to the base of the card. At this point, you can finish your card with a sentiment or jewels for added sparkle.


The products used in today's card are as follows:

Lawn Fawn - Mermaid For you, Christmas Fishes, Octopi My Heart, Duh-Nuh, and Ocean Shell-Fie stamp sets. Ocean Waves and Stitched Hillside Border Die sets

Prismacolor Premier Colored Pencils - 72pack. Unfortunately, I did not write down the specific colors I used, however, I can say I almost used all 72 pencils, haha

Copic Sketch Markers- W2, W3, W5 ,W7,C1, C3, C5, C7, G14, G19, G29, E51, E31, and E 43

Distress Oxide Inks- Tumbled Glass, Peacock Feathers, Pine Needles, Blueprint Sketch, Vintage Photo, Brushed Cordury, and Walnut Stain

I hope you enjoyed today's card and I can't wait to see all your crafty creations, bye.