Saturday, August 29, 2020

Altenew-Easy Ink Blending


Hello and welcome to today's post.


Today's card was inspired by the Altenew Easy Ink Blending class. This class is all about achieving great ink blending projects. Having the proper paper and ink blending tools are key to achieving the best results. I would also recommend trying the Distress Oxide inks as they are very easy and forgiving.


 Oxide inks are a special blend of pigment and dye ink which makes them very forgiving for crafters new to ink blending. Not only are they easy to use but they are also water-reactive, creating an oxidized effect when sprayed with water. Blending can be accomplished with either a blending brush or an ink bending tool. 

Listed are the Distress colors:

Mustard Seed
Picked Rasberry
Seedless Preserves
Salty Ocean

The flower and leaves are from the Altenew Build-A-Flower Hibiscus stamp set and cut out with the coordinating die set. Foam tape was used to adhere the images for added dimension. 

Once the background was completely dry, I heat embossed the sentiment with white embossing powder. Remember to use an anti-static power tool to remove any and all static cling. 


To finish off the card, I adhered some clear jewels from Pretty Pink Posh. 

I hope you enjoyed today's card and I can't wait to see all your ink blending projects.


Wednesday, August 26, 2020

Clean and Simple Boutique Cards


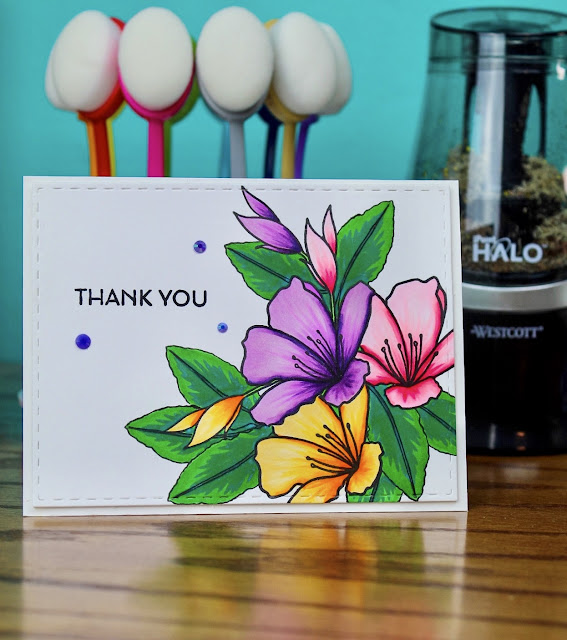
Hello, crafty friends. Today I wanted to share my clean and simple card inspired by the Clean and Simple Boutique Card class from Altenew.


 I will admit I often struggle with clean and simple cards but I love how the card turned out. I really wanted to showcase the simplicity of the card but also allow the colors of each flower to really stand out. The flowers are from the Altenew Springtime Azalea stamp set and colored using copic markers. 

The copic colors are as follows:

 V01, V04, V06, V09, BV08

RV00, RV13, RV21, RV25, RV29

Y32, Y35, Y38, YR04, YR68


After I colored the flowers I needed to stamp the leaves to give it a more boutique feel. With my flowers already stamped and colored, I needed a technique that would stamp the leaves in the background without interfering with the already colored images. 

The solution was to create multiple masks that would fit directly over the colored flowers. Using some post-it notes, I stamped the Azalea and fussy cut the post-it note. Once the mask had been cut out I temporarily adhered them directly over the already stamped image. The masking technique allows you to create an image behind another image, creating the illusion of depth. Remember when stamping multiple images, make sure to start with the image you want to be in the front and then stamp your other images. 

I finished the card with a few jewels and added sparkle to the flowers using my Spectrum Noir glitter pen.

I hope you enjoyed today's card, thanks for stopping by.

Sunday, August 23, 2020

Altenew- All about Layering

Hello, crafty friends. I am excited to be a part of the Altenew Educator Certification Program. The AECP gives you the opportunity to improve and enhance your crafting skills, while promoting their wonderful products. Each class provides six in-depth, step by step video tutorials with exclusive projects. All classes are independent classes and can be enjoyed at your convenience! 


Today's 4 1/4" x 5 1/2" top folding note card was created out of a 8 1/2" x 11" 80 lbs cardstock cut in half and scored in the middle.


 I cut a 1 5/8" panel for my Build-A-Flower: Combine leaves and an additional 2" panel to layer under my 1 5/8" panel.

  I am in desperate need of dye inks for stamping my images and with our favorite brands currently out of stock, I needed to improvise. My solution, combine the few ColorBox dye inks I have along with my Tombow dual brush pens to create the layers of my stamped images. 

Using the Misti Stamping tool, in case my stamping was not perfect, I placed the base of the leaf image on the stamp platform and colored the stamp using the Tombow 133 dual brush pen. 

After stamping the first layer, I lined the second layer directly over the first stamped image, inked, and stamped creating my second layer. Next, I lined the third layer directly over the second stamped image, inked, and stamped for my third and final layer. I repeated the process until my entire panel was covered in leaves making sure to rotate the stamp image. 


The sentiment comes from the Build-A-Flower: Ballon Flower stamp set. Using the Misti, I stamped my sentiment using Gina K Amalgam Obsidian ink. 

For some added bling, I used the Pretty Pink Posh (Shamrock,Lemon Drop) jewels.


That wraps up my first card, until next time. Thank you for stopping by!